Measure twice, buy once. It sounds simple, but in lawn care it can save you hundreds of dollars and a lot of frustration 🌱
If you’ve ever ordered turf before, you’ll know this truth very quickly: turf can’t be returned once it’s delivered. Order too much and you’re paying for grass you don’t need. Order too little and you’re left scrambling to match turf batches while half your lawn sits exposed.
As turf suppliers working with Melbourne homes every week, we see this mistake far too often. The good news is that measuring your lawn properly isn’t hard. You don’t need fancy tools or complicated maths. You just need a clear method, a bit of patience, and a smart buffer at the end.
This step-by-step guide will show you exactly how to measure your lawn for turf, including tricky shapes, so you can order the right amount the first time and lay your lawn with confidence
What You Need
Before you start, gather a few basics. Nothing special here.
That’s it. No apps required.
Short answer: Draw your lawn on paper and break it into simple shapes.
Before measuring anything, grab your paper and sketch your lawn from above. Don’t worry about being artistic. This is just a working drawing to help you think clearly.
The key idea is this:
Think of your lawn as a series of boxes.
Most lawns aren’t perfect rectangles. They’re L-shaped, have curved edges, or wrap around paths. Trying to measure them as one shape usually leads to errors.
Instead, break the lawn into basic shapes:
For example:
Label each shape on your sketch. This turns a confusing space into a clear puzzle 🧩
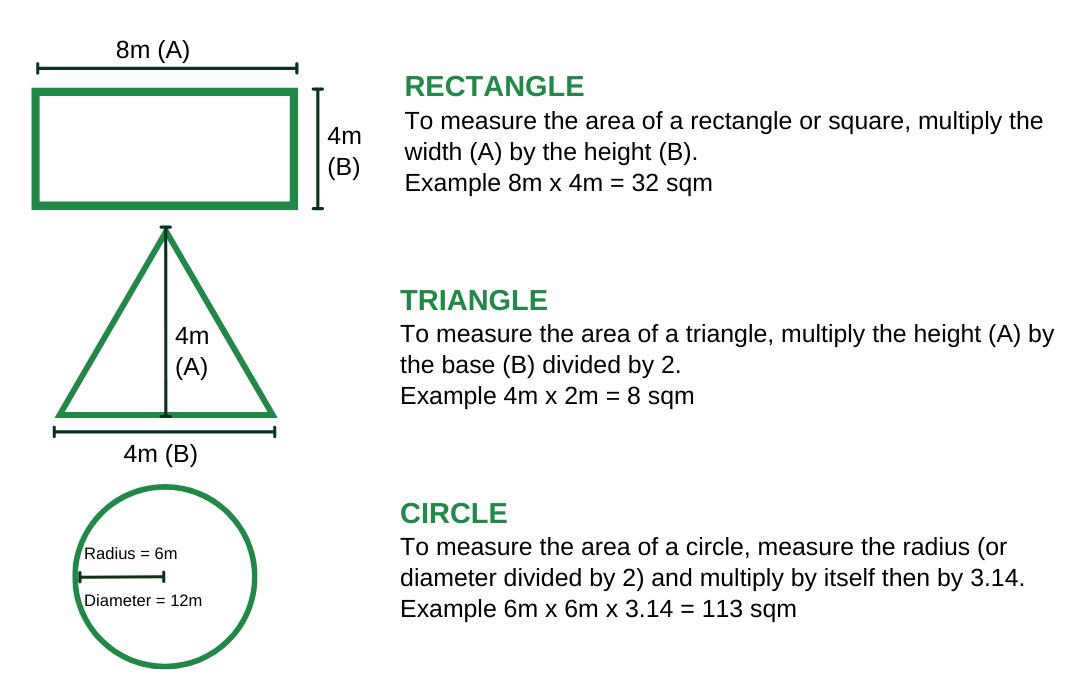
Short answer: Measure each shape separately and calculate the area in square metres.
Once your lawn is broken into shapes, measure each one carefully. Always measure in metres, not centimetres.
This will cover most lawns.
Formula:
Length × Width = Area (m²)
Example:
5 m long × 4 m wide = 20 m²
Measure along the longest edges where possible. If the sides aren’t perfectly straight, measure at the widest point.
Great for angled boundaries or awkward corners.
Formula:
(Base × Height) ÷ 2 = Area (m²)
Example:
4 m base × 3 m height ÷ 2 = 6 m²
Tip from the field: measure the triangle as neatly as possible, but don’t stress over millimetres. Turf is forgiving, maths is not always 😄
Curves look scary, but they’re manageable.
Formula:
Radius × Radius × 3.14 = Area (m²)
The radius is the distance from the centre of the circle to the edge.
Layman hack:
If the curve is small or fiddly, measure the area as a square or rectangle instead and accept a bit of extra waste. Running short is far worse than having a small offcut pile.
Short answer: Add all your shapes together, then subtract anything that won’t get turf.
Now add up the areas of all your shapes. This gives you your total lawn area.
Next, subtract permanent features you may have measured over, such as:
If in doubt, subtract conservatively. It’s safer to turf up to an edge than to fall short.
At this point, you should have a clear square metre total for your lawn.
Short answer: Add extra turf for cuts, waste, and real-world surprises.
On paper, everything looks neat. On site, it never is.
Turf needs trimming around:
This is why professionals always order a buffer.
Example:
If your measured area is 100 m²:
This buffer protects you from delays, mismatched turf batches, and half-finished lawns.
Important reminder: Excess turf can’t be returned once it’s delivered, so aim for accuracy plus a sensible buffer
Short answer: Measure anytime, but time your delivery carefully.
Measuring can be done whenever suits you. Ordering, however, should consider Melbourne’s seasons.
Pro tip: Measure first, then order turf as close as possible to your installation date. Fresh turf is living grass, not a product that likes sitting around.
Even careful homeowners trip up on these.
Every one of these leads to the same problem: not enough turf on delivery day.
Measuring your lawn properly is the quiet hero of a successful turf project. It’s not glamorous, but it’s what separates smooth installs from stressful ones.
By:
You set yourself up for a clean, professional-looking result that lasts.
Once you have your final number, you’re ready to move forward with confidence 🌿
You’ve got your measurements. The next step is choosing the right turf variety for Melbourne conditions and requesting a quote.
You can also download our printable lawn measuring guide here.